
Mako Reactor 1 is Final Fantasy 7: Ever Crisis first ever ranking event. It was postponed due to technical issues, and finally launched on Oct 2, 2023 at 7PM PT.
The ranking event offers a plethora of rewards, including tons of crystals and EXP materials.
How It Works #
- There are three ranking dungeons – Normal, Hard and Very Hard.
- You can repeat any dungeon for free and as many times as you like.
- The game keeps a record of your highest score, and tosses away lower scores.
- These exploration dungeons have treasure chests, random encounters, numerous Symbol Enemies and a Final Boss (also a Symbol Enemy).
- Defeating a Symbol Enemy allows you to select a Trance ability. These are passives that remain with you until the end of the dungeon.
- There are crystals and other goodies in treasure chests along the way, so open them all.
- There are individual rewards for each of the three stages, with S+ being the highest and netting you all the stage rewards.
- Finally, your combined score from all three dungeons help unlock Score Rewards and dictates your Ranking Rewards.
How the Scoring System Works #
The ranking event has specific criteria when determining your final score.
Trying to optimize your final score is really f-ing complicated, and I have to give credit to this game because there is a lot of testing involved to achieving a high score.
Let’s examine every single criteria.
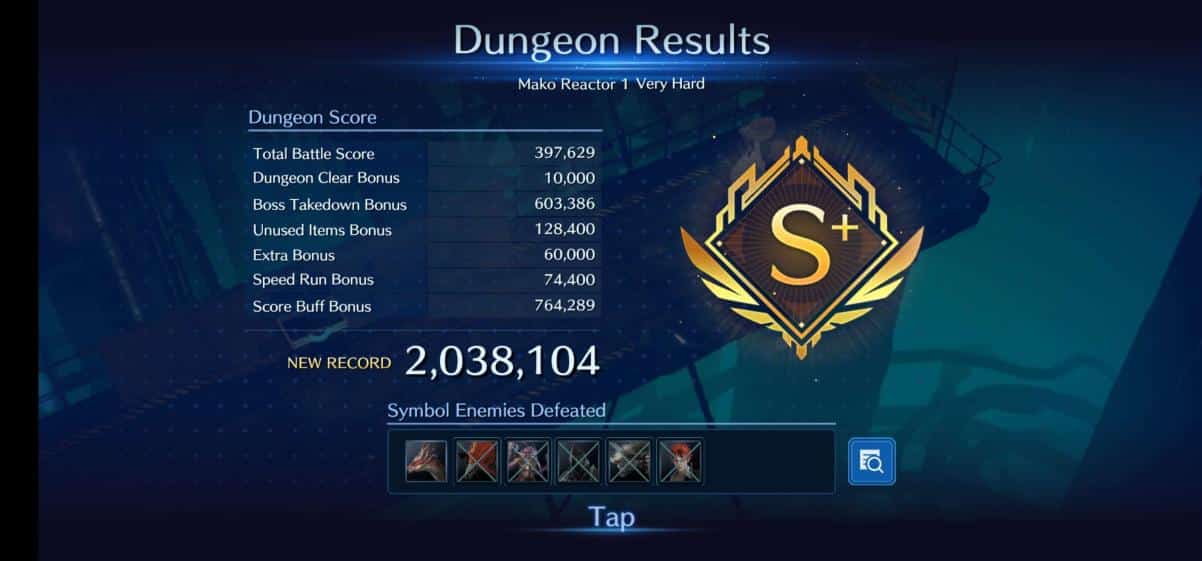
1. Total Battle Score #
The total battle score is the combined score from defeating all Symbol Enemies.
It considers your individual performance against the Symbol Enemies, and looks at these areas:
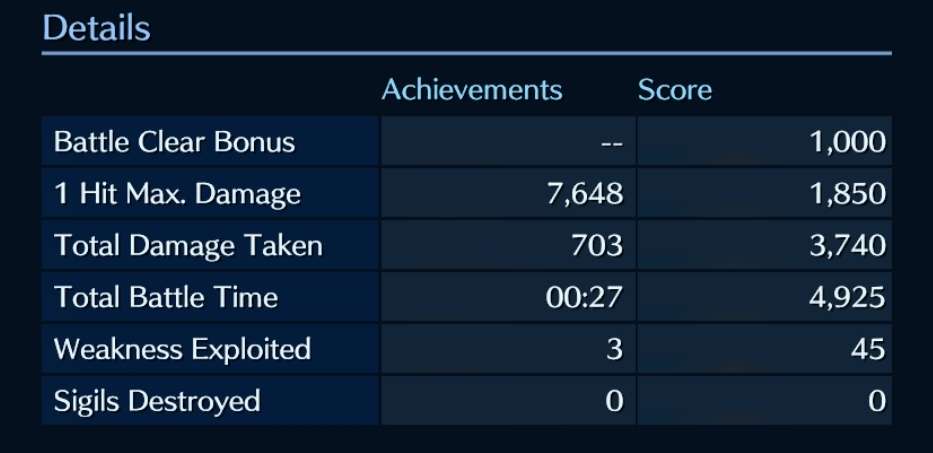
The screenshot above shows details from a Normal stage. Let’s break these down even further.
a. Battle Clear Bonus:
A fixed score you get for defeating the Symbol Enemy.
b. 1 Hit Max. Damage:
A score based on the max amount of damage you deal with a single ability. For Abilities that multi-hit, the sum of the total damage on one enemy is considered.
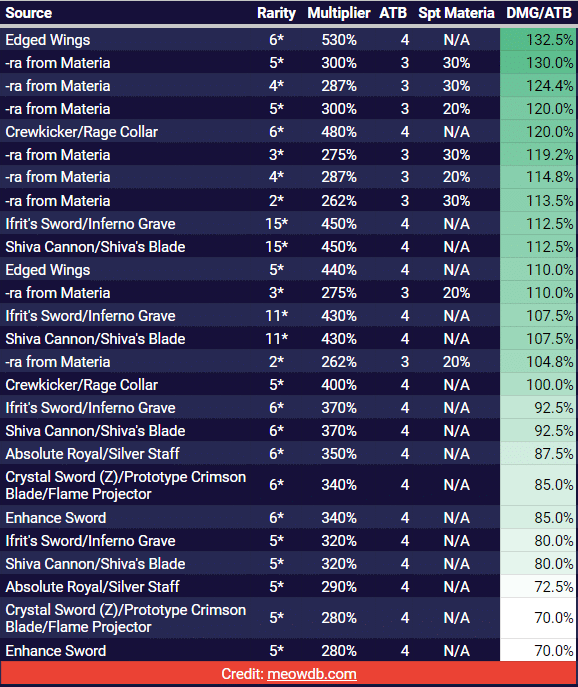
Optimize this by bringing your highest % multiplier skills. Weapon abilities with their higher skill multipliers have an advantage over materia skills. Limit Breaks and Esper summons can also become your highest Max. Damage.
There is a hard cap on the amount of score you can get from this category.
c. Total Damage Taken:
The total amount of damage your team took during the fight. Lower damage taken = higher score. Optimize this by killing the enemies faster, grabbing defensive Trance abilities, or equipping more DEF.
d. Total Battle Time:
The total amount of time your team spent beating the Symbol enemy. Faster = higher score.
Optimize this by killing the enemy faster (LOL!). One unique strategy anybody can take is by turning auto off and switching to defensive mode to build up your ATB gauge and limit break gauge when fighting random encounters. Don’t stall too long though – as it’ll cost you health and reduce your Speed Run score.
e. Weakness Exploited:
Looks at how many times you used an elemental ability that exploited the enemy weakness. Is considered a small component to score.
Optimize this by bringing the right element to every Symbol Enemy battle. From my tests, it isn’t a good idea to stall a fight just to unleash more weakness damage. You’re better off beating the enemy faster with high DPS weakness damage.
f. Sigils Destroyed:
Some Symbol enemies have Sigils that you can break and earn some points.
Optimize this by bringing the correct materia that can destroy the sigils. From my tests, you receive very little points from destroying Sigils, so don’t go out of your way delaying clears to destroy more sigils.
2. Dungeon Clear Bonus #
This is a fixed score of 10,000 points for clearing a dungeon in its entirety.
3. Boss Takedown Bonus #
While the exact pattern is not known, the score is based on how many Symbol Enemies defeated and how well you performed taking down those enemies. This is usually the biggest contributor to points. You optimize this category by optimizing every other battle category.
4. Unused Items Bonus #
This looks at two factors:
- The number of items you’ve picked up
- How many items used
Optimize this by picking every item on the stage, then use as little as possible. You obtain a perfect score by not using anything.
5. Extra Bonus #
This bonus is only available on Very Hard mode, and requires you to defeat Reno instead of the Red Dragon. You are awarded 60k points for doing so and the dungeon ends.
6. Speed Run Bonus #
Looks at the combined time you spent on Symbol Enemies and random encounters, and does not care about the time you spent running or idling on the map.
Optimize this by beating most enemies as quickly as possible. For random encounters, you could bring one strong AOE damage to clear them fast.
Keep in mind, it might be better not to kill Random Encounters too quickly because you can use them to build up ATB gauge and Limit Break.
7. Score Buff Bonus #
This bonus comes from a Trance option on Very Hard mode. The Trance acts as a score multiplier, boosting your total score by a percentage amount.
These Trances often come with hefty penalties, and require very strong or hyper-optimized builds. FYI, the top ranking players all select multiple Score Boost Trances.

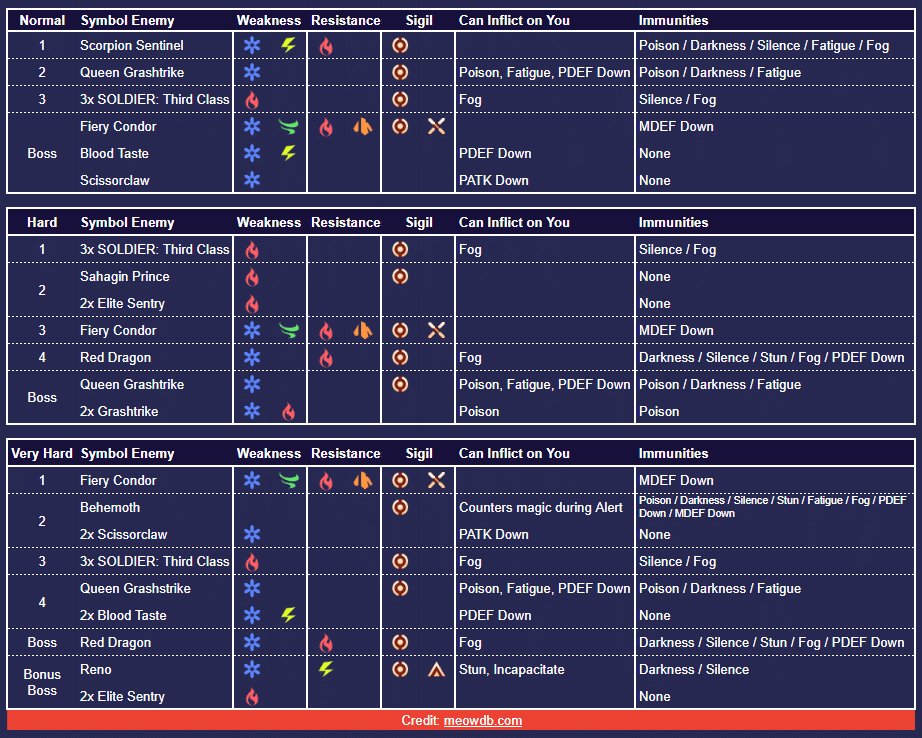
Symbol Enemy Weakness Cheat Sheet #
This section is made with the help of Shalzuth and his website. You can find a list of enemy weaknesses there.
General Strategies to Achieving High Score #
- Bring Ice and Fire to every stage, because every Symbol Enemy is weak to one of those elements
- Fira or Blizzara from Materia is very strong and useful if you don’t have stronger potency weapons (see below for efficiency)
- Beat every Symbol Enemy, but you do not need to defeat them in a linear fashion – the game does not penalize you for running around, so beat them to obtain Trance bonuses in an order that makes sense to your team comp and strategy
- You can beat annoying Symbol Enemies early because they will be easier to manage early on when your Crisis Level is low (annoying = enemies with status effects like fog/poison or elemental resistances to your team)
- You can use random non-symbol enemy encounters as a way to heal up your team, max out ATB gauge, or build up Limit Break
- Pick up every single item on the stage
- Items like Tent or Cottage should be used over Potions/Supplements, and as a last resort
- Final boss battle ends the moment the main boss dies, so you could theoretically save time by focusing the boss and ignoring the adds
- Ice is the best element to have in Very Hard mode, and Shiva will benefit well from the Blizzard Cocktail item

Normal Route #
This is the recommended enemy encounter pathing to maximize the score for most players. I assume you’re built up with Ice damage.
- Random Encounter > Queen Grashtrike (pick PATK or MATK 20%)
- Scorpion Sentinel (Pick DEF)
- Random Encounter > 3x SOLDIERS (Pick DEF)
- Fiery Condor
Reasoning: Maximize your damage early on by picking up the DPS trance. Then pick DEF trance over healing. You don’t really need to use Random Encounters to grow your ATB/Limit Break, because the enemies are so weak.
Top scoring players will bring AOE abilities to one shot every single enemy.
Hard Route #
- Random Encounter > Sahagin Prince (Pick whatever is best DPS for your team comp, usually Ice Pot.)
- Fiery Condor (Pick whatever is best DPS for your team comp, usually Mag. Attack)
- Random Encounter > Red Dragon (pick 60% PDEF/MDEF)
- 3 SOLDIERS (Pick Poison Resist)
- Queen Grashtrike (Use Shiva for fast clear)
Reasoning: The only enemy that can poison you is Queen Grashtrike, so beat the 3 SOLDIERS last. Pick up the DPS trances first to boost your damage/clear speed score, followed by the defense trance to reduce damage taken.
Very Hard Route (WIP) #
The recommended Very Hard pathing from top rankers are:
- Fiery Condor (pick score bonus trance)
- Behemoth (pick score bonus trance)
- SOLDIER: Third Class (pick score bonus trance, use Ifrit AOE LB)
- Queen Grashstrike (pick score bonus trance)
- Reno (beat him fast with Shiva/Ifrit AOE)
Top players should pick all score bonus trances.
Recommended Path #1 for Weaker Players:
This strategy is one of the easiest methods for weaker players to achieve the 1.2 million total score to obtain all rewards. It won’t get you S+ Clear Reward though.
- Bring your strongest Ice abilities and O-Sigil break materias.
- Fight the Fiery Condor, and select the bonus Trance ability.
- Skip every single Symbol Enemy, but fight a random encounter. Use this battle to max out your ATB and Limit Break gauge.
- Pick up every item along the way.
- Decide whether you want to fight the easier Red Dragon (Spam Ice/Shiva) OR fight Reno (Spam Ifrit/Shiva).
- Test to see if you need to use Ice/Fire Cocktail before the fight
- Your Ifrit should have unlocked his AOE limit break to eliminate the adds immediately
- Your Shiva should ideally have a high level limit break
(NEW*) Recommended Path #2 for Weaker Players:
This pathing is for those who want to clear the entire dungeon and do the bare minimum to get S+ rank (1.1m dungeon score).
Debrave/PATK down will go a long way for your team’s survivability.
With the new updates to how Trance abilities work, there is a new pathing for weaker players.
- Fiery Condor, select Score Up > Random Encounter (use this to build up Ifrit limit break)
- SOLDIERS (kill them fast with Ifrit), then select Mag. Attack B +60%
- Queen Grashstrike, select whichever one makes sense for your team comp, requires testing
- Behemoth, select score boost > Random Encounter (use this to build up limit breaks)
- Final Boss: Fight Reno if you have a decked out Ifrit; fight Red Dragon otherwise. Use items as needed.
All Trance options:
- Fiery Condor – 1. ice pot +15% 2. fire pot +15% 3. score bonus +30% & patk -50% & matk a -50%
- Queen Grashtrike – 1. ice pot% +15 fire pot +15% 2. ice pot +30% fire pot -30% 3.score boost + 10% & patk -25% & matk-25%
- Behemoth – 1. heal pot +10% stun res 100% 2. heal pot +10% fog res 100% 3. score boost +10% heal pot – 30%
- 3x Soldiers – 1.heal pot +30% 2. matk b +60% mdef + 60% heal pot -30% 3.score boost +10% matk b -30% mdef -30%
Notable Rewards
#
This is a very generous event and if we don’t look at the ranking awards, we can obtain a total of 3850 Crystals just for clearing all dungeons.
Mako Reactor 1 – Normal
- 300 Crystals from getting S+ (110k score)
- 50 Crystals from chest during stage exploration
- 100 Crystals for first clear
Mako Reactor 2 – Hard
- 700 Crystals from getting S+ (380k score)
- 100 Crystals for first clear
Mako Reactor 3 – Very Hard
- 2400 Crystals from getting S+ (1,100k score)
- 100 Crystals from chests during stage exploration
- 100 Crystals for first clear
Combined Score Rewards
- 1x Icon: Mako Reactor 1: Full Clear (1,200k)
- 5x Materia Booster (L) (1,100k)
- 20x Bookmark (1,000k)
- 10x Chocobooster (900k)
- 2x Dungeon Key Voucher (800k)
- 10x Materia Booster (M) (700k)
- 1x Icon: Mako Reactor 1: Clear (600k)
- 10x Bookmark (500k)
- 5x Chocobooster (400k)
- 1x Dungeon Key Voucher (300k)
- 10x Materia Booster (M) (200k)
- 10x Bookmark (100k)
- 5x Chocobooster (50k)
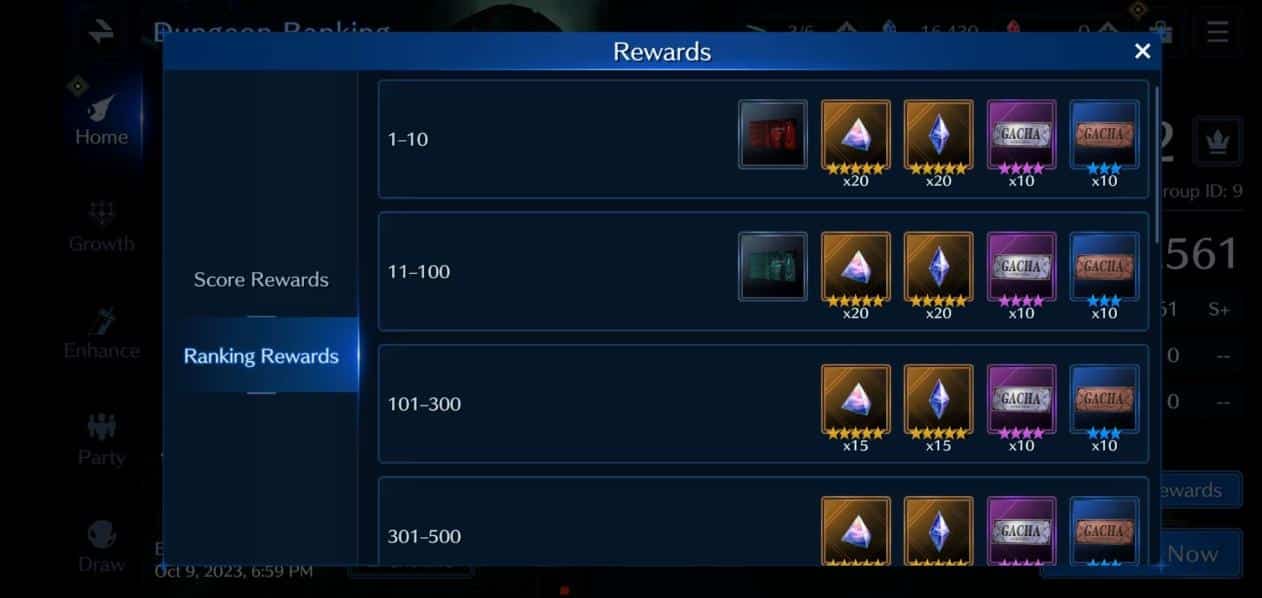
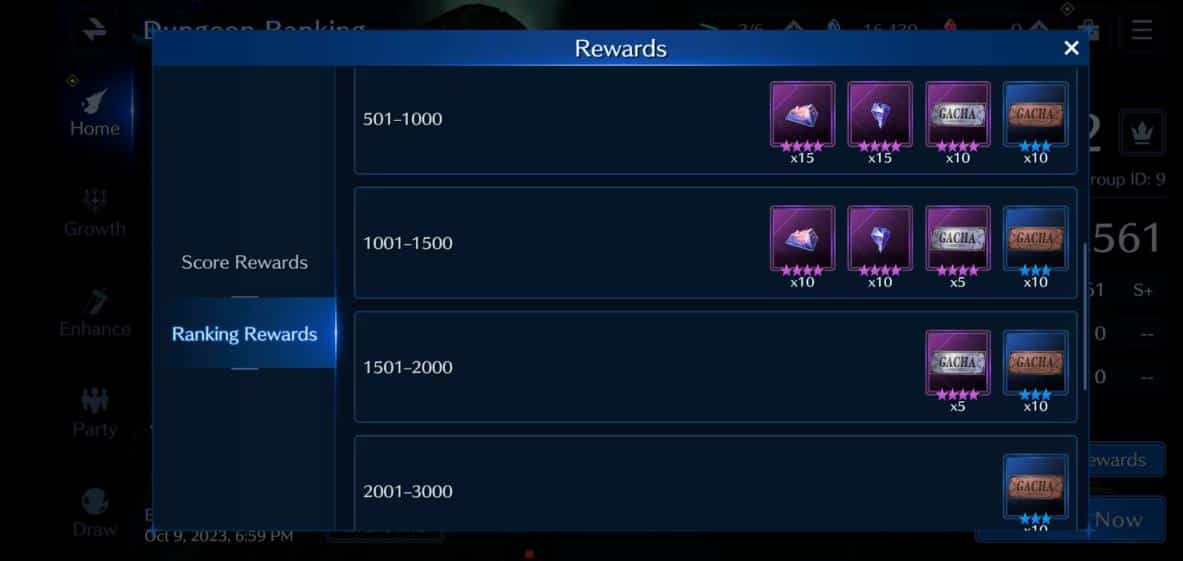
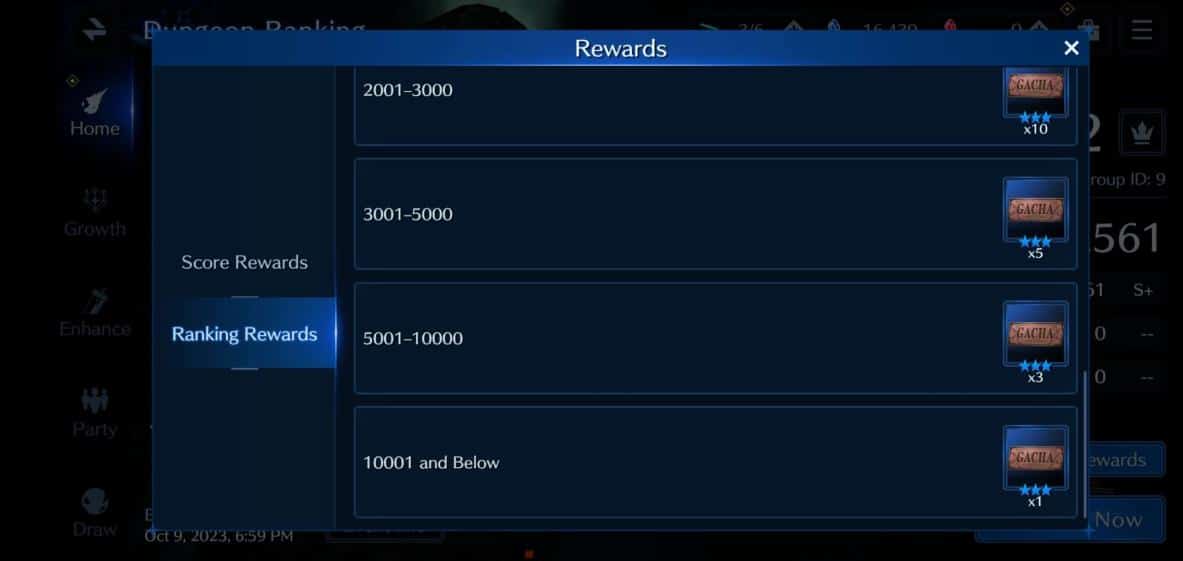
Top Ranking Rewards
A review of the FF7: Ever Crisis Crossover Event featuring time-limited weapons and costumes for Cloud and Tifa. Should you...
FF7: Ever Crisis Enemy Stats. Search by enemy name, Levels, HP, Defense, Elemental Resistances and Weaknesses, Immunities and descriptions.
Damage mechanics and formula explained for FF7: Ever Crisis. Base DMG, Skill Multiplier, Elemental Weakness DMG, Crit DMG, Buffs and...
A database of all costumes in Final Fantasy 7: Ever Crisis. Pictures, stats, rarity, and short commentary on the usefulness...
